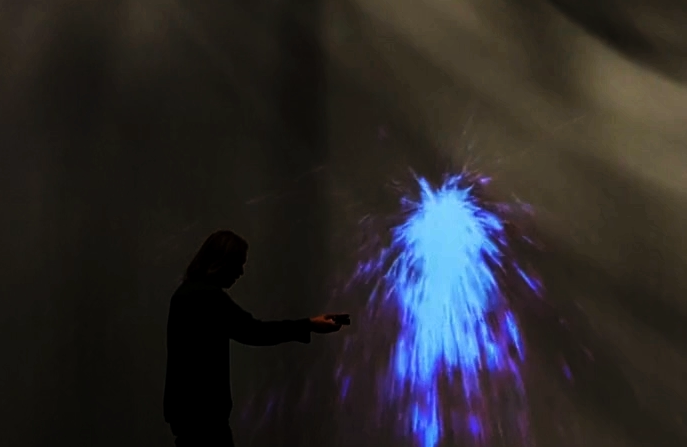
B2 Processing/Max/Syphon/Resolume Demo
Introduction I recently had the chance to build something in the Atlas B2, a cool space that has multiple projectors, mocap, lights, and 40-speaker surround sound. I’d done a number of cool …
p5 can be used for 3D graphics, although it makes much more sense to use something like three.js if you want to do any serious 3d browser development. Where WebGL really shines in p5, in my humble opinion, is for post-processing 2d sketches.
Consider this simple 2d sketch of a spinning square:
function setup() {
  createCanvas(400, 400);
  stroke(255,0,130);
  strokeWeight(1);
  noFill();
}

function draw() {

  // only partially erase our background, to create some ghosting
  background(0,30);

  // draw the rotating box to the 2d canvas
  translate(200,200);
  rotate(millis()/1000);
  rect(-100,-100,200,200);
}
To convert this to Web GL, we first have to draw it onto an off-screen graphics. We then use that graphics as the texture for a simple 3D rectangle.
The resulting sketch should look exactly the same, but this one uses WebGL which is key for applying a shader.
function setup() {

  // Create our default display canvas
  createCanvas(400,400, WEBGL);

  // We create a 2d canvas that the line drawing is produced on
  g = createGraphics(400,400);

  // basic initialization on the offscreen graphics
  g.stroke(255,0,130);
  g.strokeWeight(1);
  g.noFill();
  g.translate(200,200);

  // turn off stroke on the webgl canvas
  noStroke();

}

function draw() {
  // only partially erase our background, to create some ghosting
  g.background(0,30);

  // draw the rotating box to the 2d canvas
  g.push();
  g.rotate(millis()/1000);
  g.rect(-100,-100,200,200);
  g.pop();

  // Tell our 3d canvas (the primary one) to use the 2d one as a
  // texture
  texture(g);

  // We insert a rectangle onto our 3d canvas to hold the
  // textured 2d rectangle
  rect(-width/2, -height/2, width, height);

}
Swapping the texture for a shader is fairly easy. We’ll initialize the shader in exactly the same way as we did in the first shader example, but this time we’ll pass in the 2d graphics as a uniform into the shader. This will make it available to our shader as a texture.
One cool thing is that you can pass multiple textures into the shader and use them in different operations. This often includes a frame of pre-calculated noise, or you could also send the output from the webcam into the shader.
  // Pass in the 2D graphics to our shader
  theShader.setUniform('p5Drawing', g);
Then instead of using texture() we’ll use shader() to apply a shader to our rectangle instead of the texture.
shader(theShader);
This time our shader.frag file will look like this
// This is our 2D line drawing from p5
uniform sampler2D p5Drawing;

// function to calculate the color of the pixel
void main() {

  // Just grab the texture color from the p5 drawing
  // (Technically this is flipped, but you can't tell in this example)
  gl_FragColor = texture2D(p5Drawing, vTexCoord);
}
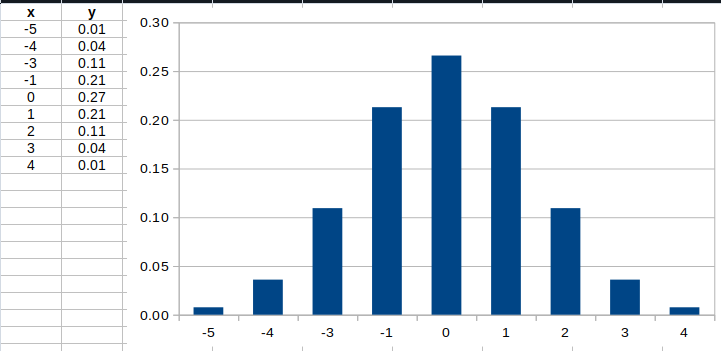
Most blurring is accomplished using some form of the Gaussian kernel. At its core this is a 2-dimensional bell curve that’s made by multiplying a 1-dimension bell curve with itself.
What is a convolution? What is a "Gaussian Kernel"?
— Grant Sanderson (@3blue1brown) September 9, 2020
(This was the main animation used at the intro of last week's convolutions lecture). pic.twitter.com/xIBHLBfB3I
This is some fairly math heavy stuff. TOTALLY FINE TO COPY THE COEFFICIENTS FROM THE INTERNET AND IGNORE THIS BIT
Here’s the 1d Curve we’re going to use. It has a mean of 0 and a standard deviation of 2-pixels. I came up with this using R.
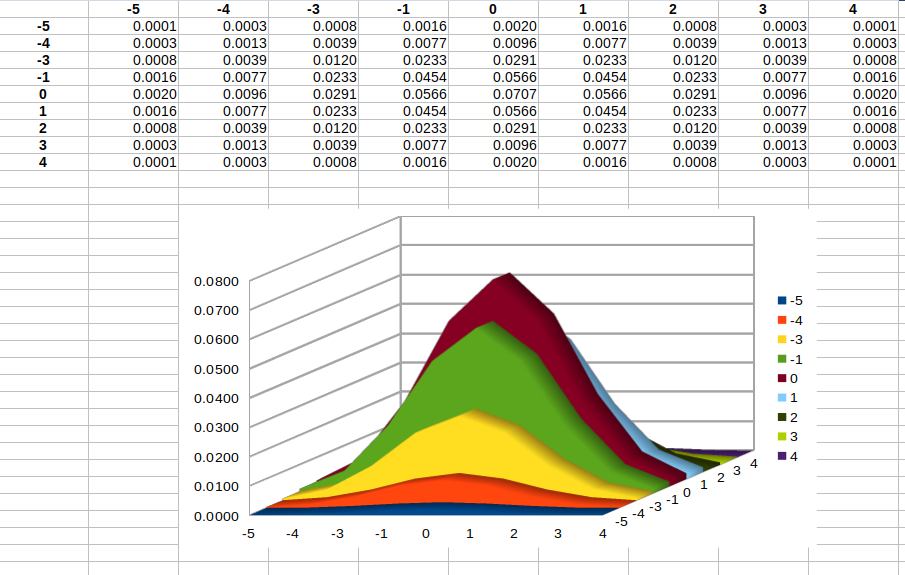
When we multiply it into 2d here’s what we get
All that really matters is that get some kinda close coefficients for the 1d Kernel. You can just use these values below and not worry about it
  // GLSL doesn't let you intialize an array with any clean syntax
  float blurWeights[9];

  blurWeights[0]=0.007597324;
  blurWeights[1]=0.035993978;
  blurWeights[2]=0.109340050;
  blurWeights[3]=0.212965337;
  blurWeights[4]=0.265961520;
  blurWeights[5]=0.212965337;
  blurWeights[6]=0.109340050;
  blurWeights[7]=0.035993978;
  blurWeights[8]=0.007597324;
First, we need to know our pixel size (with respect to our texture width of 1.0). Since we pass resolution in we can easily work that out, not that it could be a rectangle
vec2 pixelSize = vec2(1.0,1.0) /uResolution;
Now we step through 4 pixels to each side of the pixel we are interested in and calculate the blur. We can add this together into our combinedColor which is just a 4 element vector (RGBA). We are now doing 81 operations for every pixel, for every frame.
  vec4 combinedColor=vec4(0);

  // we sample 81 pixels around the pixel we care about
   for (int x = -4; x <= +4; x++) {
    for (int y = -4; y <= +4; y++) {

      // calculate the 2D kernel from the 1D kernel
      float coef = blurWeights[x+4] * blurWeights[y+4];

      vec2 coords = vTexCoord + pixelSize*vec2(x,y);

      // we use the texture2D function to get the pixel color from the underlying p5 graphics
      // we can use vector arithmetic to multiply it by our kernel
      combinedColor += (coef ) * texture2D(p5Drawing,coords);

    }
   }
function setup() {
  // initialize the webcam at the window size
  cam = createCapture(VIDEO);
  cam.size(windowWidth, windowHeight);

  // hide the html element that createCapture adds to the screen
  cam.hide();

  // REST OF SET UP CODE

}

function draw(){

  // REST OF DRAW CODE
  theShader.setUniform('p5Drawing', cam);
}
Here are some cool examples from Adam Ferriss showing how the camera can be used
Introduction I recently had the chance to build something in the Atlas B2, a cool space that has multiple projectors, mocap, lights, and 40-speaker surround sound. I’d done a number of cool …
Introduction Shaders are a powerful way to apply powerful logic to the individual pixels in a p5 sketch. We write them in the GLSL language (a form of C) then they are compiled and (generally) run on …